
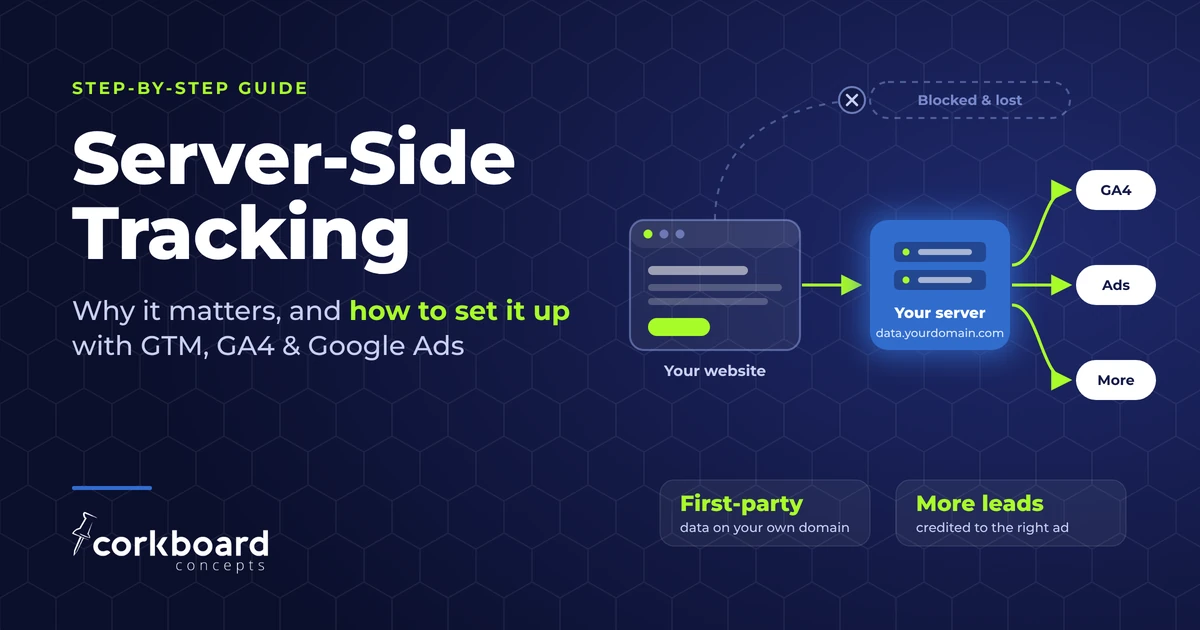
Setting Up Server Side Tracking
Ad blockers, browser privacy rules and short cookie lifetimes quietly erase a share of your leads before Google ever sees them. Here’s why moving your tracking onto your own server fixes that, and the exact setup we use at Corkboard Concepts. That said, this setup isn’t for the faint of heart. It takes a decent bit of time to do.
Why server-side tracking matters
Most websites track visitors the same way: a Google Tag Manager script runs in the visitor’s browser and sends data straight to Google Analytics, Google Ads, Meta and whoever else. That worked well for a decade. It works noticeably worse today, for three reasons.
- Ad blockers and privacy browsers block requests to 3rd party domains, especially Google. When a visitor’s browser refuses to talk to
google-analytics.com, their page views, form submissions and purchases never get recorded. - Browsers shorten cookie lifetimes. Safari limits cookies set by page scripts to 7 days, and to 24 hours when the visitor arrived from a link with tracking parameters. A prospect who clicks your ad, thinks it over, and fills out your form 10 days later looks like a brand-new visitor with no ad source.
- Ad platforms bid on what they can see. Google Ads’ automated bidding learns from your conversions. If a slice of them never arrive, or arrive without the ad click attached, the algorithm optimizes toward the wrong people and you pay more for each lead.
Server-side tracking addresses all three. Instead of the browser talking to a dozen vendors, it sends one stream of data to a server you own, on your own subdomain (for example data.yourdomain.com). That server then forwards the data to GA4, Google Ads and any other platforms.
What you get with server-side tracking:
- Gives you more complete data. Requests to your own subdomain are far less likely to be blocked than requests to Google’s domains.
- Gives longer and more reliable attribution. A tagging server on your own domain can keep the visitor’s identifier alive longer, so a lead who clicked an ad weeks ago can still be credited to that ad.
- Provides control over what you share. Every piece of data passes through a server you control before it reaches a vendor. You can filter, enrich or redact it without editing your website.
- Gives better ad matching. You can send Google Ads a scrambled (hashed) version of the lead’s email and phone along with each conversion. Google calls this enhanced conversions, and it lets Google match more leads back to the ad clicks that produced them.
- Makes for a faster site. Fewer vendor scripts running in the visitor’s browser means less work for their device.
What server-side tracking is not:
It is important to note that server-side tracking does not replace consent though. If your site needs a cookie banner, it still needs one, and your tags should still respect the visitor’s choice. It also doesn’t recover every lost conversion. It recovers the ones lost to blocking and short cookies. It’s better than standard site-side tracking, but still not perfect (that said, what is?).
How server-side tracking works with Google Tag Manager
You end up with two Google Tag Manager containers that work as a pair.
- The web container runs in the visitor’s browser (this is the traditional setup). Only code on the page can see what the visitor does: which pages they view and when they submit a form. It packages that up and sends it to your subdomain.
- The server container runs on Google Cloud at your subdomain. It receives what the web container sends and passes it on to GA4, Google Ads and others. It can’t see your website on its own; it only knows what the web container tells it.
You can think of the web container as the reporter in the field and the server container as the newsroom (wow, what an analogy). The newsroom decides what gets published and where.
Setup options with Server Side Tracking
There are several ways to set up server side tracking. The guide below follows the path we took for our own site, marked Recommended (the recommended lable is a little biased/lazy but it is what it is!). Here are the alternatives so you can weigh your options and decide which way you want to go.
| Decision | Options | When the alternative makes sense |
|---|---|---|
| Where the server runs | Google Cloud Run, created automatically from GTM | Third-party hosts (such as Stape or TAGGRS) are cheaper and simpler to start, but your data passes through another company. Manual Cloud Run suits teams that manage their own cloud infrastructure. |
| Server size | 1 always-on server, up to 10 at peak | Very low-traffic sites can try 0 minimum servers to save money, at the cost of slow first requests. High-traffic or e-commerce sites should keep 2–3 always on for redundancy. |
| Connecting your subdomain | Cloud Run domain mapping (one CNAME record) | A Google Cloud load balancer costs more but works in every region and gives more control. Domain mapping is simpler and enough for most sites. |
| GA4 cookie handling | JavaScript Managed | Server Managed (Google’s default) lets the server set a longer-lived cookie, but tools on your site can no longer read the GA client ID. Choose it if nothing on your site needs that ID. |
| Lighter alternative | Google tag gateway | Serves Google’s tags through your own domain using your CDN (for example Cloudflare). Less control than a full server container, but very little to maintain. |
Why we chose JavaScript Managed
We use a form plugin that saves each lead’s GA client ID and session ID into the CRM entry. That requires the GA cookie to stay readable by scripts on the page. If you don’t need that, Server Managed is a good choice.
Before you start setting up server-side tracking
Set aside a minimum of two to three hours, plus up to a day for DNS and the security certificate. Here is what you’ll need:
- Google Tag Manager admin access, with your existing web container already installed on the site.
- GA4 editor access to the property your site reports to.
- A Google Cloud billing account with a card on file. Check it hasn’t hit its limit of linked projects (see Phase 1).
- Access to your domain’s DNS (GoDaddy, Cloudflare, Namecheap or wherever your domain is managed).
- Website or hosting admin access, so you can clear the site’s cache after changes.
- For the lead-tracking phases: Google Ads admin access.
Phase 1Create the server container in Tag Manager
Step 1: Add a new container with the Server platform
In Google Tag Manager, open your account, click Create Container, give it a clear name (we use “[Company Name]– Server”) and choose Server as the target platform.

Step 2: Let Google provision the tagging server
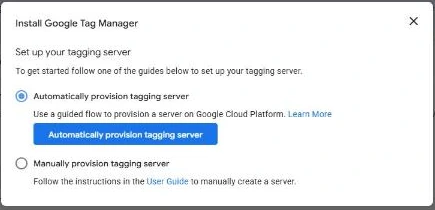
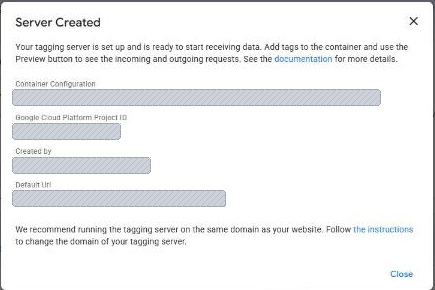
GTM immediately asks how to set up the tagging server. Choose Automatically provision tagging server. Google creates a Google Cloud project and a Cloud Run service for you.
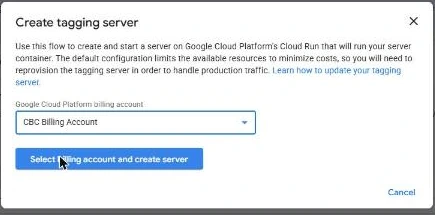
Step 3: Pick the billing account
Choose the appropriate Google Cloud billing account the server should be charged to, then click Select billing account and create server.
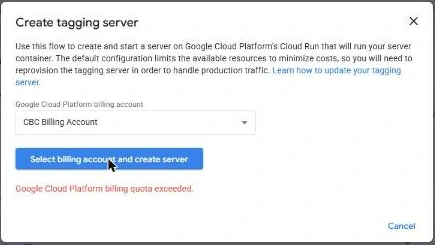
If you see “billing quota exceeded”
Each Google Cloud billing account can only have a limited number of projects linked to it (often 5). Free one up by turning off billing on an old project you no longer use (Billing → Account management → the project’s ⋮ menu → Disable billing), or request a quota increase from Google. Then click the button again.
After a few minutes GTM confirms the server is created and shows its default address (something like server-side-tagging-xxxx.a.run.app). Copy it somewhere handy; you’ll replace it with your own subdomain in Phase 3.
Phase 2Make Cloud Run production-ready
Google’s automatic setup is deliberately minimal to keep costs low while you test. Before real traffic hits it, make three changes in the Google Cloud console.
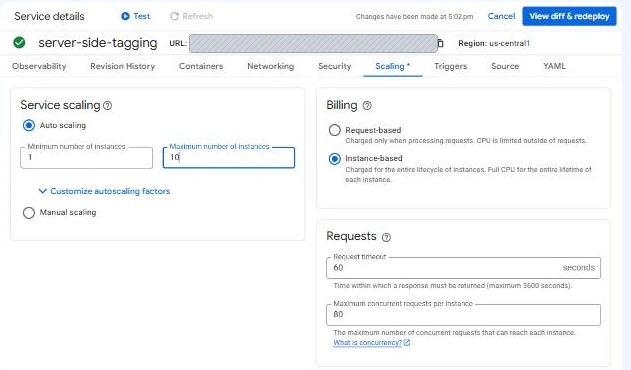
Step 4: Keep one server always running
Open Cloud Run → Services → server-side-tagging → Edit & deploy new revision (or the Scaling tab). Set Minimum number of instances to 1 and Maximum to 10. Leave billing on Instance-based, then click Deploy.
Leave the separate preview service at its defaults; it’s only used while you test.
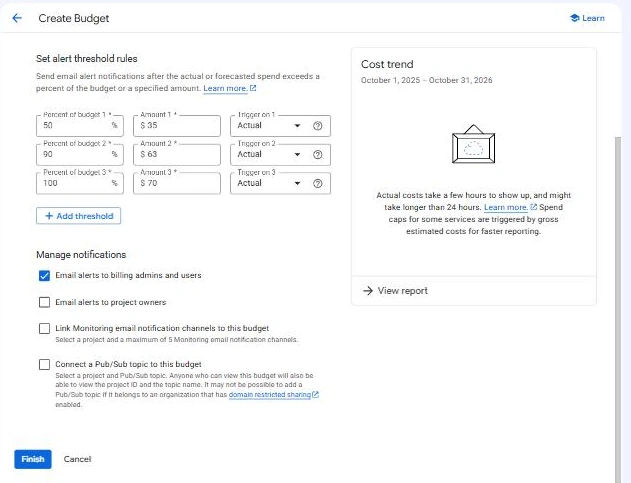
Step 5: Set a budget alert
Go to Billing → Budgets & alerts → Create budget. Scope it to the new tagging project, set a monthly amount a bit above the expected cost (we used $70), and add alerts at 50%, 90% and 100% of actual spend.
Step 6: Stop paying to log every request
By default Cloud Run writes a log line for every tracking hit, and logging is billed by volume. Open Logging → Log Router, edit the _Default sink, and add an exclusion filter (we named it sgtm-request-logs):
LOG_ID("run.googleapis.com/requests")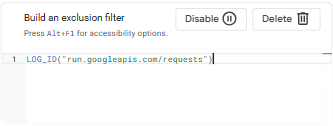
Phase 3Use your own subdomain
This is the step that makes the tracking first-party. Pick a short, neutral subdomain. We use data; avoid words like “tracking” or “analytics” that blocklists look for. That said, it’s a free country, you name it whatever you like!
Step 7: Map the subdomain in Cloud Run
In Cloud Run, open Domain mappings → Add mapping. Choose the server-side-tagging service, select your verified domain, and type the subdomain.
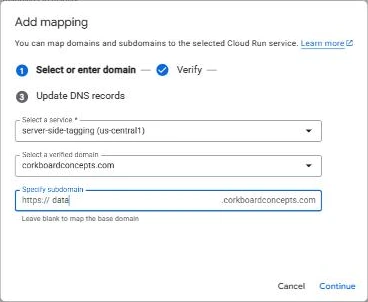
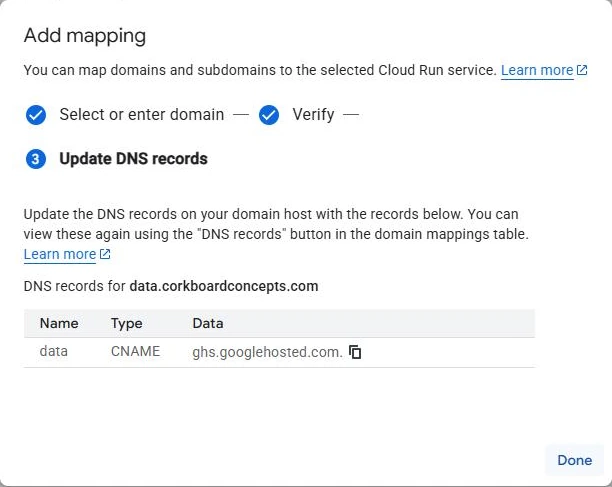
Google then shows the DNS record to create, usually a CNAME pointing to ghs.googlehosted.com.
Step 8: Add the DNS record
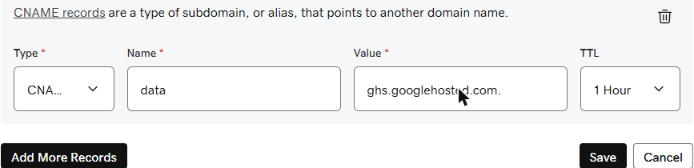
At your DNS provider (ours is GoDaddy: Domain → DNS → Add New Record), create the CNAME exactly as shown and save it.
Step 9: Wait for the certificate, then check the health page
Google issues a free security certificate once it sees the DNS record. That took me about 30 minutes for setting up server side tracking on my site, but can take up to 24 hours. When the mapping shows a green check, visit https://data.yourdomain.com/healthy. It should return the word ok.

Tip
The health page is /healthy, not /healthz. The second returns a Google 404 page, which can look like a broken setup when nothing is wrong (don’t ask how I figured this out, but I’m sure you can guess).
Phase 4Configure the server container
Back in Google Tag Manager, open the server container.
Step 10: Tell GTM about your subdomain
Go to Admin → Container Settings and replace the default Server container URL with https://data.yourdomain.com. Save.
Step 11: Set up the GA4 client
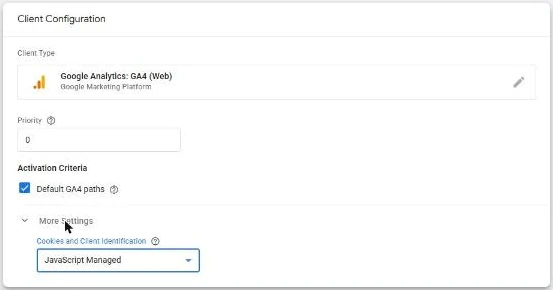
A client is the part of the server container that recognizes incoming data. Open Clients → GA4 (it’s created for you). Expand More Settings and set Cookies and Client Identification to JavaScript Managed, then save. (See Your options if you’d rather keep Server Managed.)
Step 12: Create a trigger for GA4 traffic
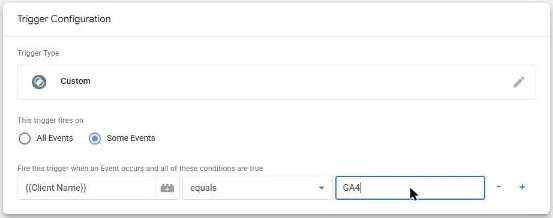
Go to Variables → Configure and turn on the built-in Client Name variable. Then create a trigger: type Custom, fires on Some Events, where Client Name equals GA4. Name it Client – GA4.
Step 13: Forward everything to GA4
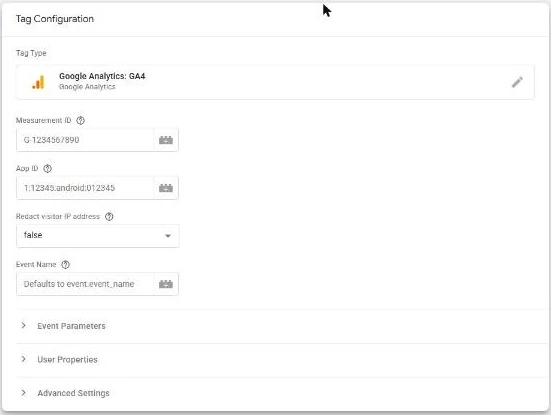
Create a tag of type Google Analytics: GA4. Leave the Measurement ID blank (it’s passed through from the website), attach the Client – GA4 trigger, and name it GA4 – Forward all events.
Phase 5Route your website through it
Step 14: Point the web container’s Google tag at your server
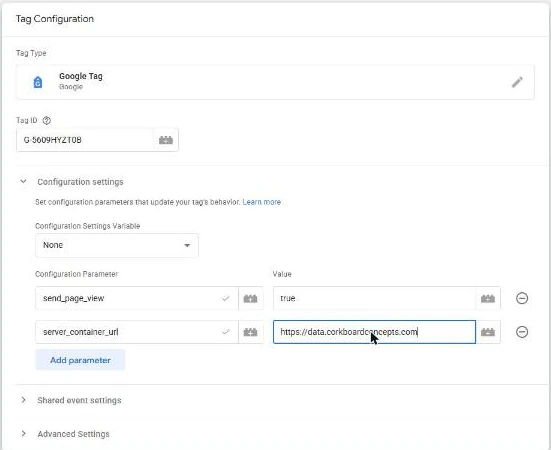
Open the web container and edit your GA4 Google Tag (the one with your G- ID). Under Configuration settings, add a parameter named server_container_url with the value https://data.yourdomain.com. Save.
Phase 6Test and publish
Step 15: Preview both containers together
Always start with the server container’s Preview first, then the web container’s Preview, which opens Tag Assistant and your site in a new window. Click around a few pages in that window.
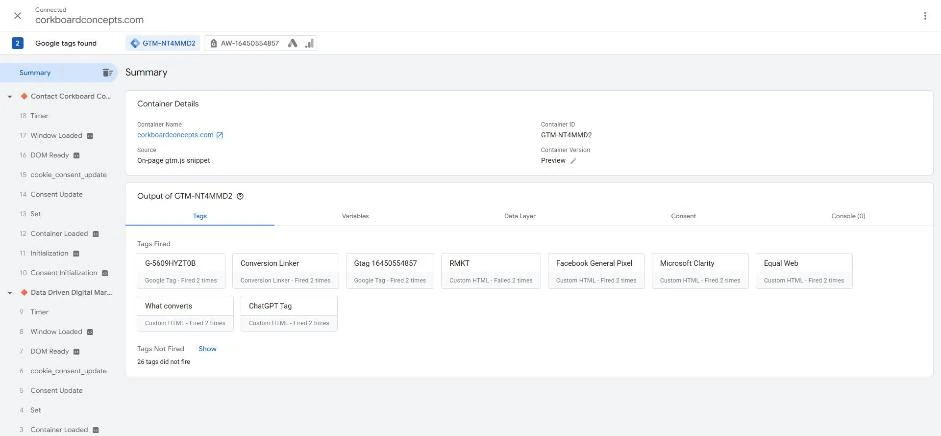
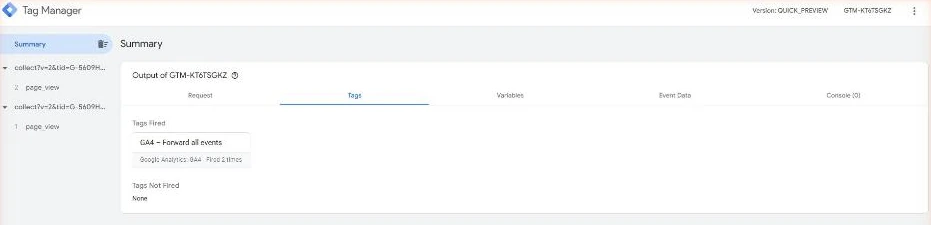
page_view requests appear on the left, and GA4 – Forward all events fires for each.Testing your website forms
Go through and submit a form on your website. Notify anyone on your team that receives these forms so that they’re aware that these tests will come through. Also, be mindful of changes to your forms because a small change on the form can throw tracking off (this is the same as it’s always been though).
Note: If your form has a reCAPTCHA, a person has to tick it. Submit it in the window Tag Assistant opened, not in a normal tab, or the test won’t show up in Preview. Coming soon: I’ll post a Claude Skill I use for checking conversions.
Step 16: Publish server first, then web
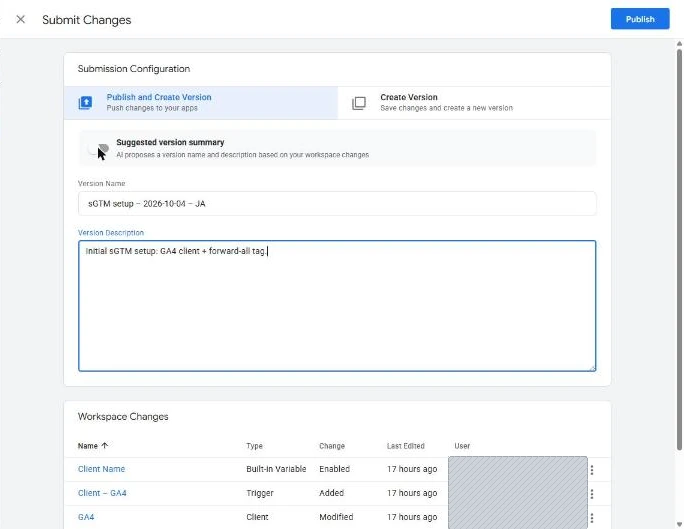
Click Submit in the server container, give the version a clear name and description, and Publish. Then do the same in the web container. Before you publish the web container, check the Workspace Changes list for edits by anyone else that aren’t ready to go live.
Tip
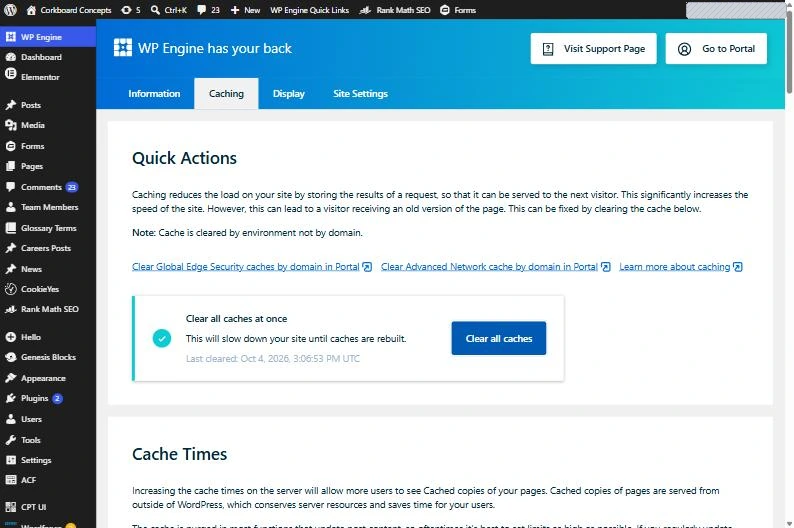
Give it about 15 minutes before checking your live site or clear your cache on your website. Browsers cache Google Tag Manager’s script, so live hits can keep going to Google directly for a short while after you publish.
At this point server-side tracking is live. The rest of the guide connects it to your lead forms and Google Ads, which is where most of the value for lead-generation businesses comes from.
Phase 7Track leads and conversions
A tagging server is only as useful as the events you send it. For a lead-generation site, the event that matters most is the form submission. We send one clean event, generate_lead, carrying where the lead came from and a scrambled copy of their contact details.
Step 17: Capture attribution on your forms
We use a small WordPress plugin with Gravity Forms. It remembers each visitor’s first and most recent traffic source across visits, saves those values plus the GA client ID and session ID into the form entry, and after a successful submission pushes a generate_lead event into the page’s data layer (the list of events Tag Manager reads from the page). Any form tool that can do the same will work.
The event carries fields like these:
event: "generate_lead"
form_id, form_name
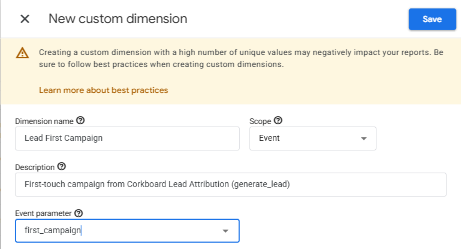
first_source, first_medium, first_campaign
last_source, last_medium, last_campaign
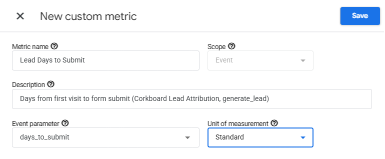
days_to_submit, session_count, page_count
event_id: "gf-77"          // unique per lead; prevents double counting
user_data: { sha256_email_address, sha256_phone_number }
After installing a plugin like this, clear your site’s cache so every page loads the new script. If you use a “delay JavaScript” or optimization plugin, exclude the attribution script from it.
Then submit a test lead with test UTM parameters (for example ?utm_source=test&utm_medium=cpc&utm_campaign=prod-check) and confirm the entry contains the source fields and the GA client ID. Delete the test entry afterwards.
Step 18: Prepare GA4
In GA4 Admin:
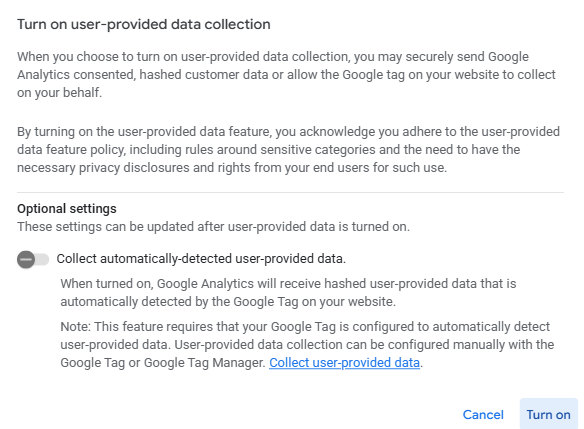
- Data collection: turn on user-provided data collection. You can leave automatic detection off, because the form already sends the data in the right format.
- Data retention: set event data retention to 14 months.
- Custom definitions: create event-scoped custom dimensions for the attribution fields, and custom metrics for the number fields, so you can report on them.
- Events: once
generate_leadshows up (it can take up to 24 hours), click its star to mark it as a key event (make sure you bookmark this and come back to it, I forget to close the loop on this more often than I like to admit).
Step 19: Create the Google Ads conversion
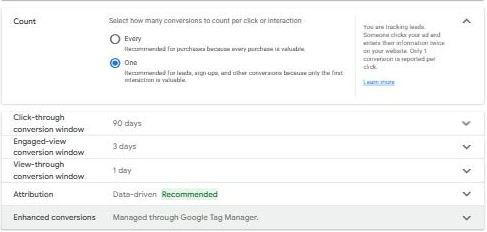
In Google Ads, go to Goals → Conversions → Create conversion action → Website → Manually with code. Choose the Submit lead form category and use these settings:
- Count: One. A lead who submits twice is still one lead.
- Attribution: Data-driven.
- Enhanced conversions: managed through Google Tag Manager.
When it’s saved, choose Use Google Tag Manager and note the Conversion ID and Conversion label.
Step 20: Build the lead tag in the web container
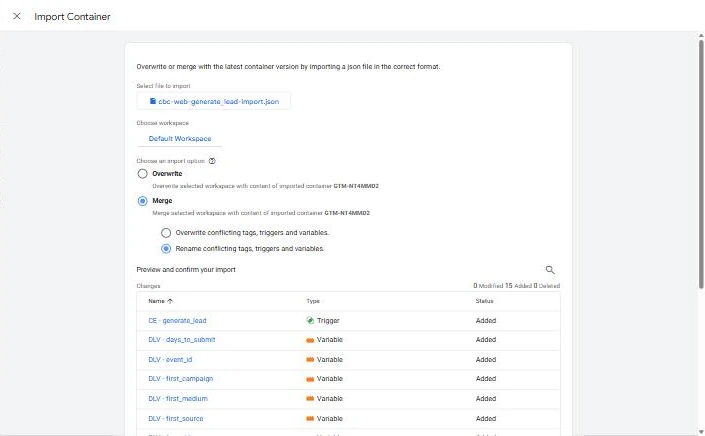
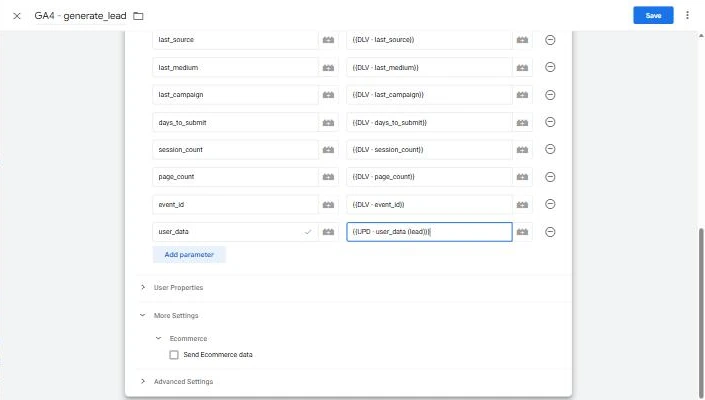
In the web container you need: a Data Layer Variable for each field, a trigger for the generate_lead event, and a GA4 Event tag that sends it all. With more than a dozen pieces, importing them is faster than clicking each one together. We built a small import file and used Admin → Import Container with Merge → Rename conflicting tags, triggers and variables, so nothing existing was overwritten.
Then add a User-Provided Data variable (type Code) that reads the user_data object from the data layer.

In the GA4 – generate_lead event tag, add two more event parameters: user_data set to that variable, and transaction_id set to the event_id variable. The server uses the transaction ID to make sure each lead is only counted once in Google Ads.
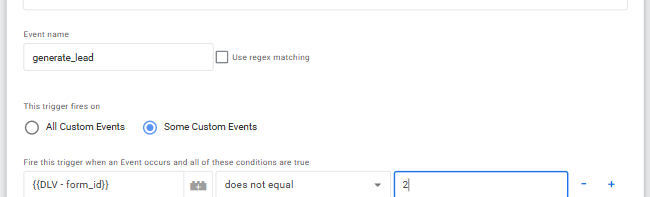
If a form shouldn’t count as a lead (for example a job application form), exclude it in the trigger.
Avoid double counting
Pause (don’t delete) any older tags that already fire on the same form submission, such as a previous “Contact Us” GA4 event (delete is harder to revert back to if you decide to, or if something goes wrong, so pausing is always the safer option). Otherwise each lead is counted twice.
Step 21: Add Conversion Linker and the Ads tag in the server container
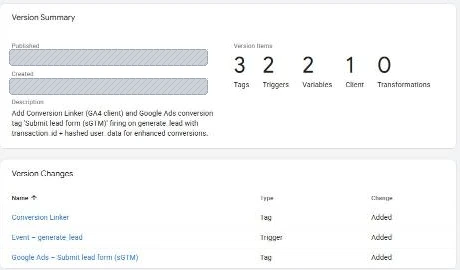
In the server container, create two tags:
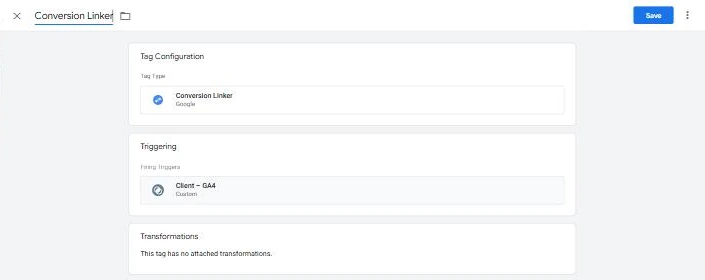
- Conversion Linker, firing on the Client – GA4 trigger. It keeps the Google ad-click ID attached to the visitor so later conversions can be credited to the right click.
- Google Ads Conversion Tracking, using the Conversion ID and label from Step 19, firing on a new Custom trigger where
Event Nameequalsgenerate_lead.
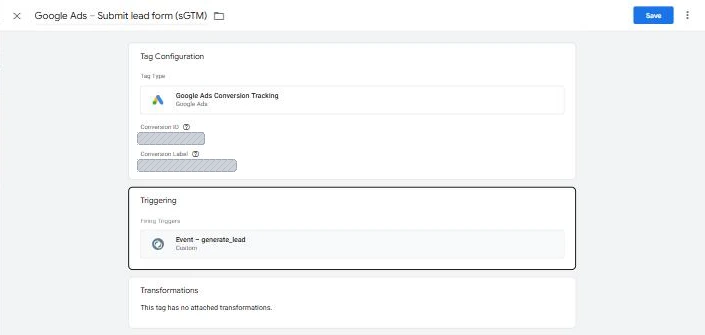
transaction_id and user_data from the incoming event, so there’s nothing extra to map.Phase 8Tag your Google Ads clicks
For reports to show which campaign and ad group produced each lead, every ad click needs to arrive with readable labels.
Step 22: Turn on auto-tagging and set an account-wide URL suffix
In Google Ads, go to Admin → Account settings. Make sure Auto-tagging is Yes. Under Tracking, add a Final URL suffix, which is added to the end of every ad’s landing page address:
utm_source=google&utm_medium=cpc&utm_campaign={_campaign}&utm_term={keyword}&utm_content={_adgroup}&campaign={_campaign}&campaignid={campaignid}&adgroup={_adgroup}&adgroupid={adgroupid}&keyword={keyword}&matchtype={matchtype}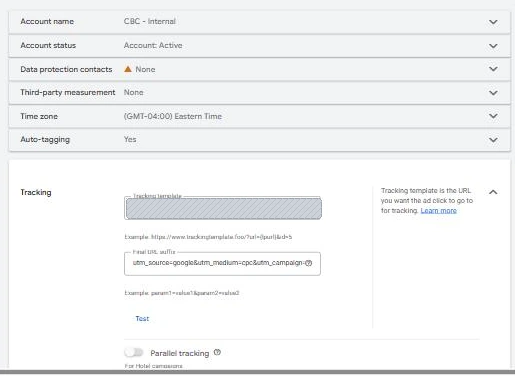
Check for conflicting templates
If any campaign has its own tracking template that already adds UTM tags, change it to just {lpurl}. Otherwise you’ll get duplicate, conflicting parameters.
Step 23: Give campaigns and ad groups readable names
{_campaign} and {_adgroup} are custom parameters: labels you set yourself. Add _campaign in each campaign’s Settings → Campaign URL options, and _adgroup in each ad group’s Ad group settings → Ad group URL options. Use short, lowercase, hyphenated values.
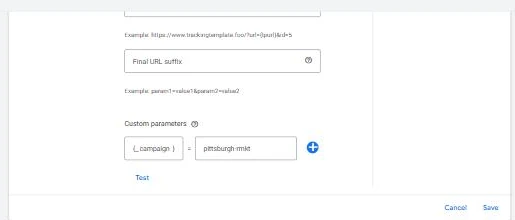
_campaign = pittsburgh-rmkt.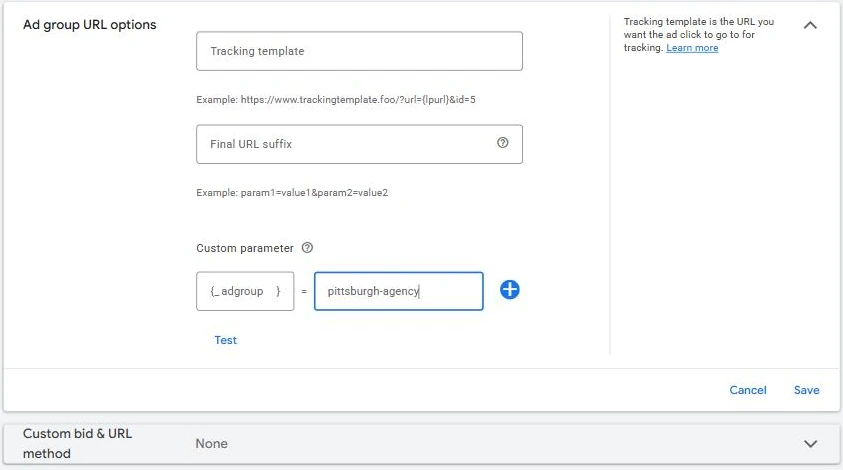
_adgroup = pittsburgh-agency. Remember to add this to every new ad group you create.Google Business Profile
Tag your Business Profile website link too, so map and listing traffic is labeled. For example: ?utm_source=google&utm_medium=organic&utm_campaign=directories.
Phase 9Final test and cleanup
Step 24: Run a full test lead through Preview
Start the server Preview, then the web Preview, and submit a test lead in the Tag Assistant window. Check:
- In web Preview, GA4 – generate_lead fired once.
- In server Preview, GA4 – Forward all events, Conversion Linker and the Google Ads tag all fired on
generate_lead. - On the Event Data tab,
transaction_idand the hasheduser_dataare present. - On the Request tab, the outgoing requests to Google returned 200 or 204.

Step 25: Publish, server first
Publish the server container, then the web container, with clear version notes.
Step 26: Clean up old conversion actions
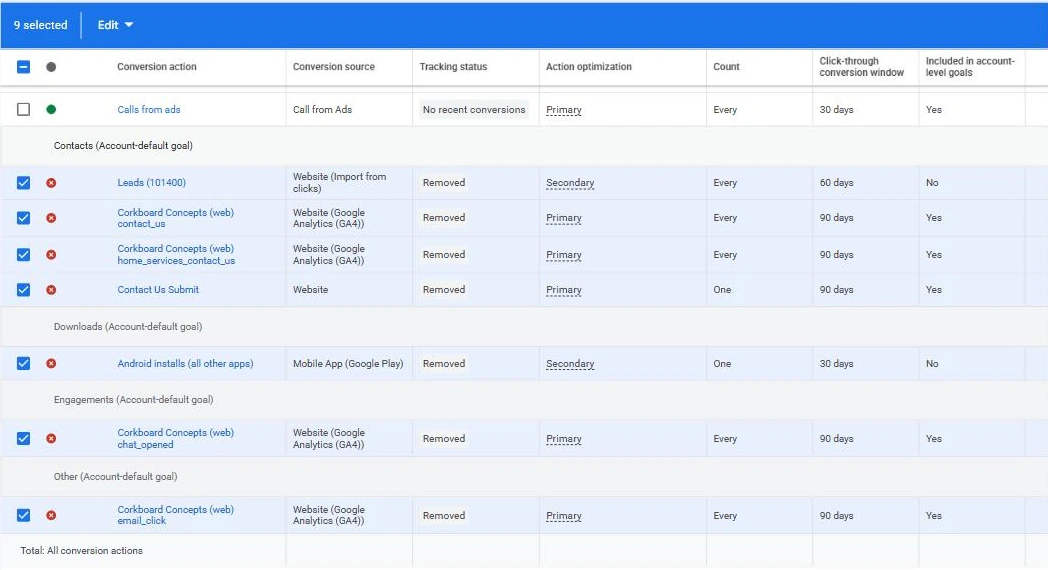
Old conversion actions (page-load “thank you” conversions, GA4 imports of the same form, button clicks) compete with the new one and confuse automated bidding. In Goals → Conversions → Summary → View all conversion actions, select the ones you no longer want and choose Edit → Remove. We kept only phone call conversions and the new lead form conversion.
Monitoring server side tracking after launch
- Same day: GA4 Realtime shows
generate_leadwhen a real lead comes in. Mark it as a key event once it appears in Admin → Events. - Within 1–3 days: the Google Ads conversion’s status changes from Inactive to Recording conversions.
- After about a week: check Goals → Conversions → Diagnostics for your enhanced conversions match rate.
- Every week: compare form entries, GA4
generate_leadevents and Google Ads conversions. They won’t match exactly, but a sudden gap means something broke. - Every month: check the Google Cloud bill against your budget.
Common pitfalls
| Symptom | Likely cause and fix |
|---|---|
| “Billing quota exceeded” when creating the server | The billing account has too many linked projects. Disable billing on an unused project or request a quota increase. |
| Health check returns a 404 page | You checked /healthz. Use /healthy. |
| Form tools can’t read the GA client ID | The GA4 client is set to Server Managed. Switch it to JavaScript Managed. |
| Hits still go to google-analytics.com after publishing | The browser cached the old GTM script. Wait about 15 minutes and clear your site cache. |
| Leads counted twice in GA4 or Ads | An old form tag or conversion action still fires. Pause the tag or remove the conversion action. |
| Test lead doesn’t appear in Preview | It was submitted from a normal tab. Submit it in the Tag Assistant window. |
| Domain mapping stuck on “pending” | The DNS record is wrong or hasn’t spread yet. Check the CNAME value ends in ghs.googlehosted.com. and wait up to 24 hours. |
Now, you can either go through this entire setup yourself, or let us handle it (recommended).
Want server-side tracking without the setup?
Corkboard Concepts data and analytics professionals set up and maintain server-side tracking, lead attribution and Google Ads conversion tracking for businesses that want to know exactly where every lead comes from.